Web服务之LNMMP架构及动静分离实现
发布时间:2014-05-21 09:27:52作者:知识屋
一、LNMMP
LNMMP环境是Linux + Nginx + Memcached + MySQL + PhP,即LNMP + memcached。
Memcached 是一个高性能的分布式内存对象缓存系统,用于动态Web应用以减轻数据库负载。它通过在内存中缓存数据和对象来减少读取数据库的次数,从而提供动态、数据库驱动网站的速度。Memcached基于一个存储键/值对的hashmap。其守护进程(daemon )是用C写的,但是客户端可以用任何语言来编写,并通过memcached协议与守护进程通信。
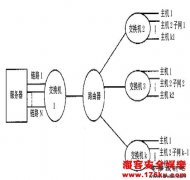
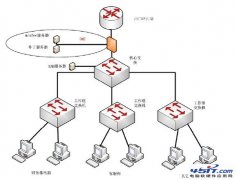
二、工程拓扑

三、安装nginx服务器
- 1)部署开发环境
- # yum -y install "Development tools" "Server Platform Development"
- 2)解决依赖 pcre-devel openssl-devel
- # yum -y install pcre-devel openssl-devel
- 3) 设置用户
- # groupadd -r nginx
- # useradd -r -g nginx nginx
- 4)编译安装nginx-1.4.7
- # tar xf nginx-1.4.7.tar.gz
- # cd nginx-1.4.7
- # ./configure --prefix=/usr --sbin-path=/usr/sbin/nginx
- --conf-path=/etc/nginx/nginx.conf --error-log-path= /var/log/nginx/error.log --http-log-path=/var/log/nginx/access.log
- --pid-path=/var/run/nginx/nginx.pid --lock-path=/var/lock/nginx.lock --user=nginx --group=nginx --with-http_ssl_module
- --with-http_flv_module --with-http_stub_status_module
- --with-http_gzip_static_module --http-client-body-temp-path= /var/tmp/nginx/client/ --http-proxy-temp-path=/var/tmp/nginx/proxy/ --http-fastcgi-temp-path=/var/tmp/nginx/fcgi/
- --http-uwsgi-temp-path=/var/tmp/nginx/uwsgi --http-scgi-temp-path=
- /var/tmp/nginx/scgi --with-pcre
- # make && make install
- 5)检测配置文件语法
- # /usr/sbin/nginx -t
- 6) 提供启动脚本
- # vim /etc/rc.d/init.d/nginx
- 内容如下
- # nginx - this script starts and stops the nginx daemon
- #
- # chkconfig: - 85 15
- # description: Nginx is an HTTP(S) server, HTTP(S) reverse
- # proxy and IMAP/POP3 proxy server
- # processname: nginx
- # config: /etc/nginx/nginx.conf
- # config: /etc/sysconfig/nginx
- # pidfile: /var/run/nginx.pid
- # Source function library.
- . /etc/rc.d/init.d/functions
- # Source networking configuration.
- . /etc/sysconfig/network
- # Check that networking is up.
- [ "$NETWORKING" = "no" ] && exit 0
- nginx="/usr/sbin/nginx"
- prog=$(basename $nginx)
- NGINX_CONF_FILE="/etc/nginx/nginx.conf"
- [ -f /etc/sysconfig/nginx ] && . /etc/sysconfig/nginx
- lockfile=/var/lock/subsys/nginx
- make_dirs() {
- # make required directories
- user=`nginx -V 2>&1 | grep "configure arguments:" | sed 's/[^*]*--user=([^ ]*).*/1/g' -`
- options=`$nginx -V 2>&1 | grep 'configure arguments:'`
- for opt in $options; do
- if [ `echo $opt | grep '.*-temp-path'` ]; then
- value=`echo $opt | cut -d "=" -f 2`
- if [ ! -d "$value" ]; then
- # echo "creating" $value
- mkdir -p $value && chown -R $user $value
- fi
- fi
- done
- }
- start() {
- [ -x $nginx ] || exit 5
- [ -f $NGINX_CONF_FILE ] || exit 6
- make_dirs
- echo -n $"Starting $prog: "
- daemon $nginx -c $NGINX_CONF_FILE
- retval=$?
- echo
- [ $retval -eq 0 ] && touch $lockfile
- return $retval
- }
- stop() {
- echo -n $"Stopping $prog: "
- killproc $prog -QUIT
- retval=$?
- echo
- [ $retval -eq 0 ] && rm -f $lockfile
- return $retval
- }
- restart() {
- configtest || return $?
- stop
- sleep 1
- start
- }
- reload() {
- configtest || return $?
- echo -n $"Reloading $prog: "
- killproc $nginx -HUP
- RETVAL=$?
- echo
- }
- force_reload() {
- restart
- }
- configtest() {
- $nginx -t -c $NGINX_CONF_FILE
- }
- rh_status() {
- status $prog
- }
- rh_status_q() {
- rh_status >/dev/null 2>&1
- }
- case "$1" in
- start)
- rh_status_q && exit 0
- $1
- ;;
- stop)
- rh_status_q || exit 0
- $1
- ;;
- restart|configtest)
- $1
- ;;
- reload)
- rh_status_q || exit 7
- $1
- ;;
- force-reload)
- force_reload
- ;;
- status)
- rh_status
- ;;
- condrestart|try-restart)
- rh_status_q || exit 0
- ;;
- *)
- echo $"Usage: $0 {start|stop|status|restart|condrestart|try-restart|reload|force-reload|configtest}"
- exit 2
- esac
- 7)为服务脚本赋予执行权限
- # chmod +x /etc/rc.d/init.d/nginx
- 8)添加到系统服务并开机启动
- # chkconfig --add nginx
- # chkconfig nginx on
- # chkconfig --list nigx
- 9) 设置nginx配置文件的语法高亮
- # mkdir ./vim/syntax -pv
- # cd .vim/syntax
- # wget http:
- # cd .vim
- # vim filetype.vim 内容如下
- au BufRead,BufNewFile /etc/nginx/*,/usr/local/nginx/conf/* if &ft == '' | setfiletype nginx | endif
- 10)启动服务
- # service nginx start
- # ss -tnalp | grep nginx
四、安装MySQL服务器
1.安装
- # tar xf mysql-5.5.33-linux2.6-x86_64.tar.gz -C /usr/local
- # ln -sv /usr/local/mysql-5.5.33-linux2.6-x86_64 mysql 创建软连接,易于操作
2.为数据库创建数据目录
- #mkdri -pv /mydata/data
3.新建用户以安全方式运行进程
- #groupadd -r mysql
- #useradd -r -s /sbin/nologin -g mysql mysql -M -D /mydata/data mysql
- #chown -R mysql:mysql /mydata/data
4.初始化mysql
- # cd /usr/local/mysql
- # scripts/mysql_install_db --datadir=/mydata/data --user=mysql
- # chown -R root .
5.提供脚本
- #cd /usr/local/mysql
- #cp support-files/mysql.server /etc/rc.d/init.d/mysqld
- //设置脚本mysqld
- #chmod +x /etc/rc.d/init.d/mysqld
- //给脚本执行权限
- # chkconfig
- //添加开机启动
- # chkconfig mysqld on
6.提供配文件
- #cd /usr/local/mysql
- #cp support-files/my-large.cnf /etc/my.cnf
- #vim /etc/my.cnf
- thread_concurrency = 2
- //修改,并发线程数,bithread_concurrency的值为CPU个数乘以2
- datadir = /mydata/data
- #添加,mysql数据文件的存放路径:
7.其他配置
- # vim /etc/profile.d/mysqld.sh
- exportPATH=/usr/local/mysql/bin:$PATH
- # source /etc/profile.d/mysqld.sh
- #vim /etc/man.config
- MANPATH /usr/local/mysql/man//添加此行
- # ln -sv /usr/local/mysql/include /usr/include/mysql
- //输出mysql的头文件至系统头文件路径/usr/include
- # echo '/usr/local/mysql/lib' > /etc/ld.so.conf.d/mysql.conf
- //输出mysql的库文件给系统库
- #ldconfig //重载系统库:
8.启动服务
- # service mysqld start
- # ss -tnl | grep 3306
9.用户初始化
- #mysql
- mysql> use mysql
- mysql> selecthost,user,password from user;
- mysql> DELETE FROM user WHERE user = ''; //删除空用户
- mysql> DELETE FROM user WHERE user = '::1'; //删除ipv6用户
- mysql> UPDATE user SET password = PASSWORD('Hoolee') WHERE password = '';
- //为root用户设置密码
- mysql> FLUSH PRIVILEGES;
五、安装php服务器
1.解决开发环境和依赖关系
- # yum -y install bzip2-devel
- # yum -y install libmcrypt-devel
- # yum -y groupinstall "Desktop Platform Development"
2.安装php
- # tar xf php-5.4.26.tar.bz2
- # cd /usr/src/php-5.4.26/
- # ./configure--prefix=/usr/local/php --with-openssl
- --with-mysql=mysqlnd --with-mysqli=mysqlnd --with-pdo-mysql=mysqlnd
- --enable-mbstring --with-freetype-dir --with-jpeg-dir
- --with-png-dir --with-zlib--with-libxml-dir=/usr --enable-xml
- --enable-sockets --with-apxs2=/usr/local/apache2/bin/apxs
- --with-mcrypt --with-config-file-path=/etc --with-config-file-scan-dir=/etc/php.d
- --with-bz2 --enable-maintainer-zts
- # make && make install
3.提供配置文件
- # cp php.ini-production /etc/php.ini
4.为php-fpm提供脚本,并将其添加到服务列表
- # cp sapi/fpm/init.d.php-fpm /etc/rc.d/init.d/php-fpm
- # chmod +x /etc/rc.d/init.d/php-fpm
- # chkconfig --add php-fpm
- # chkconfig php-fpm on
5.为php-fpm提供配置文件
- # cp /usr/local/php/etc/php-fpm.conf.default /usr/local/php/etc/php-fpm.conf
6.编辑php-fpm配置文件
- # vim /usr/local/php/etc/php-fpm.conf
- pm.max_children = 150
- pm.start_servers = 8
- pm.min_spare_servers = 5
- pm.max_spare_servers = 10
- pid = /usr/local/php/var/run/php-fpm.pid
- listen = 172.16.1.11:9000
7.启动php-fpm
- # service php-fpm start
- # ps -aux | grep php-fpm
六、安装php加速器xcache
1.安装xcache
- # tar xf xcache-3.0.3.tar.gz
- # cd xcache-3.0.3
- # /usr/local/php/bin/phpize
- 外挂模块,若你想在原来编译好的php中加入memcached或者
- ImageMagick等扩展模块,就需要使用phpize
- # # ./configure --enable=xcache --with-php-config=/usr/local/php/bin/
- php-config
- # make && make install
2.编辑配置文件,整合php + xcache
- # vim xcache.ini
- extension = /usr/local/php/lib/php/extensions/no-debug-zts-20100525/xcache.so
- # cp xcache.ini /etc/php.d/
3.重启php-fpm
- # service php-fpm restart
七、配置nginx
1.编辑/etc/nginx/nginx.conf,实现动静分离
- worker_processes 2; #worker进程的个数
- error_log /var/log/nginx/error.log notice; #错误日志路径及级别
- events {
- worker_connections 1024; #每个worker能够并发响应的最大请求数
- }
- http {
- include mime.types; #支持多媒体类型
- default_type application/octet-stream;
- sendfile on; #由内核直接转发
- #keepalive_timeout 0;
- keepalive_timeout 5; #持久连接5s
- gzip on; #开启压缩功能
- server {
- listen 80;
- server_name www.hoo.com;
- add_header X-via $server_addr; #让客户端能够看到代理服务器的IP
- location / {
- root html;
- index index.php index.html index.htm;
- }
- location ~* .(jpg|jpeg|png|gif|js|css)$ { #匹配静态内容
- root html; #默认目录在/usr/local/nginx/html
- }
- location ~ .php$ { #匹配动态php文件
- root html;
- fastcgi_pass 172.16.7.11:9000; #代理到的服务器
- fastcgi_index index.php;
- fastcgi_param SCRIPT_FILENAME scripts$fastcgi_script_name;
- include fastcgi_params;
- }
- }
- }
2.编辑/etc/nginx/fastcgi_params
- fastcgi_param GATEWAY_INTERFACE CGI/1.1;
- fastcgi_param SERVER_SOFTWARE nginx;
- fastcgi_param QUERY_STRING $query_string;
- fastcgi_param REQUEST_METHOD $request_method;
- fastcgi_param CONTENT_TYPE $content_type;
- fastcgi_param CONTENT_LENGTH $content_length;
- fastcgi_param SCRIPT_FILENAME $document_root$fastcgi_script_name;
- fastcgi_param SCRIPT_NAME $fastcgi_script_name;
- fastcgi_param REQUEST_URI $request_uri;
- fastcgi_param DOCUMENT_URI $document_uri;
- fastcgi_param DOCUMENT_ROOT $document_root;
- fastcgi_param SERVER_PROTOCOL $server_protocol;
- fastcgi_param REMOTE_ADDR $remote_addr;
- fastcgi_param REMOTE_PORT $remote_port;
- fastcgi_param SERVER_ADDR $server_addr;
- fastcgi_param SERVER_PORT $server_port;
- fastcgi_param SERVER_NAME $server_name;
3.重载nginx
- # service nginx reload
八、安装Memcached服务器[!--empirenews.page--]分页标题[/!--empirenews.page--]
1.memcached特性
Memcached是一款开发工具,它既不是一个代码加速器,也不是数据库中间件。其设计哲学思想主要反映在如下方面:
(1)简单key/value存储:服务器不关心数据本身的意义及结构,只要是可序列化数据即可。存储项由“键、过期时间、可选的标志及数据”四个部分组成;
(2)功能的实现一半依赖于客户端,一半基于服务器端:客户负责发送存储项至服务器端、从服务端获取数据以及无法连接至服务器时采用相应的动作;服务端负责接收、存储数据,并负责数据项的超时过期;
(3)各服务器间彼此无视:不在服务器间进行数据同步;
(4)O(1)的执行效率
(5)清理超期数据:默认情况下,Memcached是一个LRU缓存,同时,它按事先预订的时长清理超期数据;但事实上,memcached不会删除任何已缓存数据,只是在其过期之后不再为客户所见;而且,memcached也不会真正按期限清理缓存,而仅是当get命令到达时检查其时长;
2.安装memcached
a).部署开发环境,解决依赖关系
- # yum groupinstall "Development Tools" "Server Platform Deveopment" -y
- # yum install -y libevent-devel
- # tar xf memcached-1.4.15.tar.gz
- # cd memcached-1.4.15
- # ./configure --prefix=/usr/local/memcached --with-libevent=/usr/local/libevent
- # make && make install
c).为memcached提供启动脚本
- #!/bin/bash
- #
- # Init file for memcached
- #
- # chkconfig: - 86 14
- # description: Distributed memory caching daemon
- #
- # processname: memcached
- # config: /etc/sysconfig/memcached
- . /etc/rc.d/init.d/functions
- ## Default variables
- PORT="11211"
- USER="nobody"
- MAXCONN="1024"
- CACHESIZE="64"
- OPTIONS=""
- RETVAL=0
- prog="/usr/local/memcached/bin/memcached"
- desc="Distributed memory caching"
- lockfile="/var/lock/subsys/memcached"
- start() {
- echo -n $"Starting $desc (memcached): "
- daemon $prog -d -p $PORT -u $USER -c $MAXCONN -m $CACHESIZE -o "$OPTIONS"
- RETVAL=$?
- [ $RETVAL -eq 0 ] && success && touch $lockfile || failure
- echo
- return $RETVAL
- }
- stop() {
- echo -n $"Shutting down $desc (memcached): "
- killproc $prog
- RETVAL=$?
- [ $RETVAL -eq 0 ] && success && rm -f $lockfile || failure
- echo
- return $RETVAL
- }
- restart() {
- stop
- start
- }
- reload() {
- echo -n $"Reloading $desc ($prog): "
- killproc $prog -HUP
- RETVAL=$?
- [ $RETVAL -eq 0 ] && success || failure
- echo
- return $RETVAL
- }
- case "$1" in
- start)
- start
- ;;
- stop)
- stop
- ;;
- restart)
- restart
- ;;
- condrestart)
- [ -e $lockfile ] && restart
- RETVAL=$?
- ;;
- reload)
- reload
- ;;
- status)
- status $prog
- RETVAL=$?
- ;;
- *)
- echo $"Usage: $0 {start|stop|restart|condrestart|status}"
- RETVAL=1
- esac
- exit $RETVAL
d).添加memcached至服务列表
- # chmod +x /etc/init.d/memcached
- # chkconfig --add memcached
- # service memcached start
- # ss -tnlp | grep 11211
九、安装php的memcached扩展
1.安装memcached扩展
- # tar xf memcache-2.2.7.tgz
- # cd memcache-2.2.7
- # /usr/local/php/bin/phpize
- # ./configure --with-php-config=/usr/local/php/bin/php-config --enable-memcache
- # make && make install
2.编辑配置文件,整合php + memcached
- # vim xcache.ini
- extension = /usr/local/php/lib/php/extensions/no-debug-zts-20100525/memcache.so
3.重启php-fpm
- # service php-fpm restart
4.对memcached功能进行测试,在网站目录中建立测试页面test.php
- # vim test.php
- <?php
- $mem = new Memcache;
- $mem->connect("172.16.1.13", 11211) or die("Could not connect");
- $version = $mem->getVersion();
- echo "Server's version: ".$version."<br/>n";
- $mem->set('hellokey', 'Hello World', 0, 600) or die("Failed to save data at the memcached server");
- echo "Store data in the cache (data will expire in 600 seconds)<br/>n";
- $get_result = $mem->get('hellokey');
- echo "$get_result is from memcached server.";
- ?>
- ~
测试访问即可。
5.安装wordpress测试访问即可
十、安装memadmin-master查看memcached状态信息
1.解压即可使用
- //解压至php服务器/usr/local/nginx/html/
2.测试访问
www.hoo.com/memadmin-master
知识阅读


软件推荐
更多 >


-
1菜鸟简单抓肉鸡(如何抓肉鸡)
2011-06-17
-
2
电脑开机时出现lass.exe进程是病毒吗?
-
3
自拍须谨慎!教你如何通过照片定位查看拍摄地点
-
4
电脑病毒最基础知识
-
5
黑客学员必须了解的C语言技术
-
6
精典详细内网渗透专题文章
-
7
教你破解Tp-Link的无线路由密码
-
8
解决SecureCRT中文显示乱码
-
9
QQ电脑管家和360哪个好?横评实测对比
-
10
攻防实战:无线网络路由入侵过程