Redhat搭建RHCS和共享存储
发布时间:2014-09-05 16:46:12作者:知识屋
利用Redhat Rhcs套件搭建高可用性群集,宾实现iscsi网络存储!
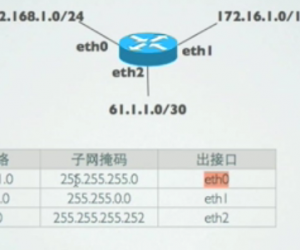
拓补图如下:
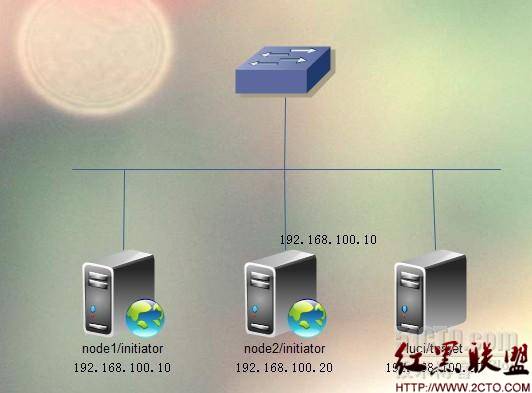
targetServer
安装软件
[root@localhost ~]# yum -y install scsi-target-utils
开启服务
[root@localhost ~]# service tgtd start
[root@localhost ~]#chkconfig tgtd on
添加磁盘分区
[root@localhost ~]# fdisk /dev/sdb
创建共享磁盘
[root@localhost ~]#tgtadm --lld iscsi --op new --mode target --tid 1 --targetname iqn.2011-21.com.a.target:disk
[root@localhost ~]#tgtadm --lld iscsi --op new --mode=logicalunit --tid=1 --lun=1 --backing-store /dev/sdb
tgtadm --lld iscsi --op bind --mode=target --tid=1 --initiator-address=192.168.100.0/24
开机自启动
[root@localhost ~]# vim /etc/rc.d/rc.local
tgtadm --lld iscsi --op new --mode target --tid 1 --targetname iqn.2011-21.com.a.target:disk
tgtadm --lld iscsi --op new --mode=logicalunit --tid=1 --lun=1 --backing-store /dev/sdb
tgtadm --lld iscsi --op bind --mode=target --tid=1 --initiator-address=192.168.100.0/24
initiator1
安装软件
[root@node1 ~]# yum -y install iscsi-initiator-utils
开启服务
[root@node1 ~]# service iscsi start
[root@node1 ~]#chkconfig iscsi on
登陆磁盘
[root@node1 ~]#iscsiadm --mode discovery --type sendtargets --portal 192.168.100.30
[root@node1 ~]# iscsiadm --mode node --targetname iqn.2011-21.com.a.target:disk --portal 192.168.100.30 --loginl
开机自启动
vim /etc/rc.d/rc.local
iscsiadm --mode discovery --type sendtargets --portal 192.168.100.30
iscsiadm --mode node --targetname iqn.2011-21.com.a.target:disk --portal 192.168.100.30 --loginl
initiator2
安装软件
[root@node1 ~]# yum -y install iscsi-initiator-utils
开启服务
[root@node1 ~]# service iscsi start
[root@node1 ~]#chkconfig iscsi on
登陆磁盘
[root@node1 ~]#iscsiadm --mode discovery --type sendtargets --portal 192.168.100.30
[root@node1 ~]# iscsiadm --mode node --targetname iqn.2011-21.com.a.target:disk --portal 192.168.100.30 --loginl
开机自启动
vim /etc/rc.d/rc.local
iscsiadm --mode discovery --type sendtargets --portal 192.168.100.30
iscsiadm --mode node --targetname iqn.2011-21.com.a.target:disk --portal 192.168.100.30 –loginl
GFS文件系统
node1
[root@node1 ~]#pvcreate /dev/sdb
[root@node1 ~]#partprobe /dev/sdb
[root@node1 ~]#service clvmd restart
[root@node1 ~]#lvcreate -L 1500M -n lv1 vg1
[root@node1 ~]#gfs_mkfs -p lock_dlm -t cluster1:lv1 -j 3 /dev/vg1/lv1 //名字为群集名:逻辑卷名
[root@node1 ~]#service clvmd restart
node2
[root@node2 ~]#partprobe /dev/sdb
[root@node2 ~]#service clvmd restart
注释:
1.登陆磁盘后需要在每个结点上键入 partprobe /dev/sdb 同步磁盘信息,创建卷组,逻辑卷后,两个结点都会显示卷组,逻辑卷信息,如果不显示 每个结点 键入service clvmd restart !
2.设置GFS文件系统需要在创建cluster1,添加结点之后,否则提示clvmd服务不存在!
node1配置
修改主机名和hosts文件
[root@localhost ~]#vim /etc/sysconfig/network
HOSTNAME=node1.a.com
[root@localhost ~]# hostname node1.a.com
[root@localhost ~]#vim /etc/hosts
192.168.100.10 node1.a.com node1
192.168.100.20 node2.a.com node2
安装软件,开启服务
[root@localhost ~]#yum –y install ricci
[root@localhost ~]#service ricci start
[root@localhost ~]#chkconfig ricci on
node2配置
修改主机名和hosts文件
[root@localhost ~]#vim /etc/sysconfig/network
HOSTNAME=node1.a.com
[root@localhost ~]# hostname node1.a.com
[root@localhost ~]#vim /etc/hosts
192.168.100.11 node1.a.com node1
192.168.100.20 node2.a.com node2
安装软件,开启服务
[root@localhost ~]#yum –y install ricci
[root@localhost ~]#service ricci start
[root@localhost ~]#chkconfig ricci on
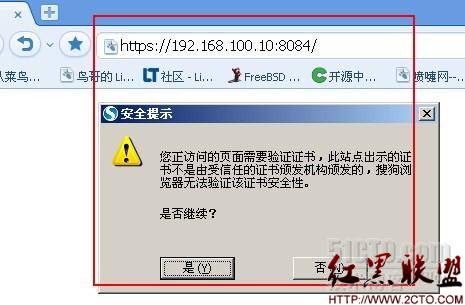
luci设置
安装luci
[root@target ~]# yum -y install luci
初始化
[root@target ~]#luci_admin init
重启服务
[root@target ~]#chkconfig luci on
[root@target ~]#luci_admin init
[root@target ~]#service luci restart
群集设置
创建cluster1
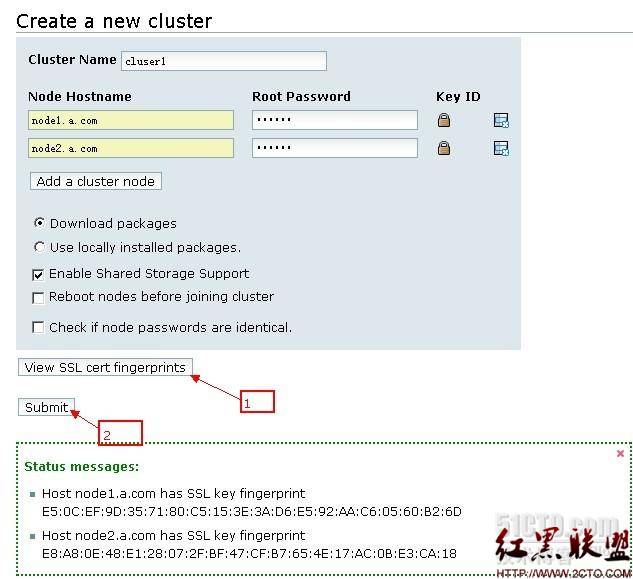
添加结点
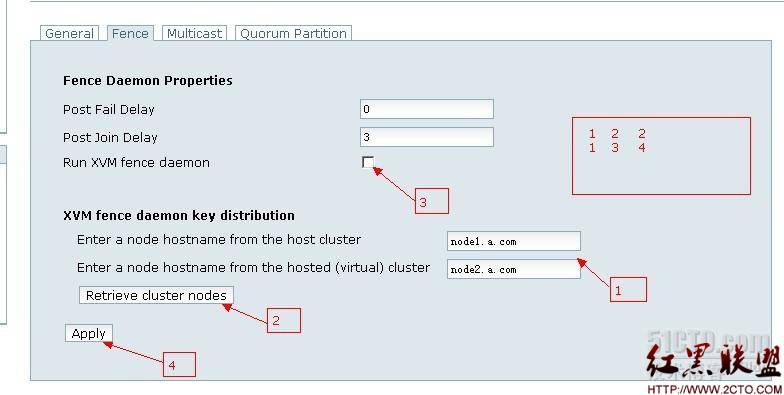
创建fence
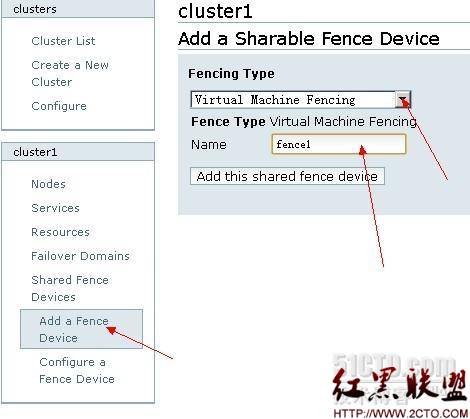
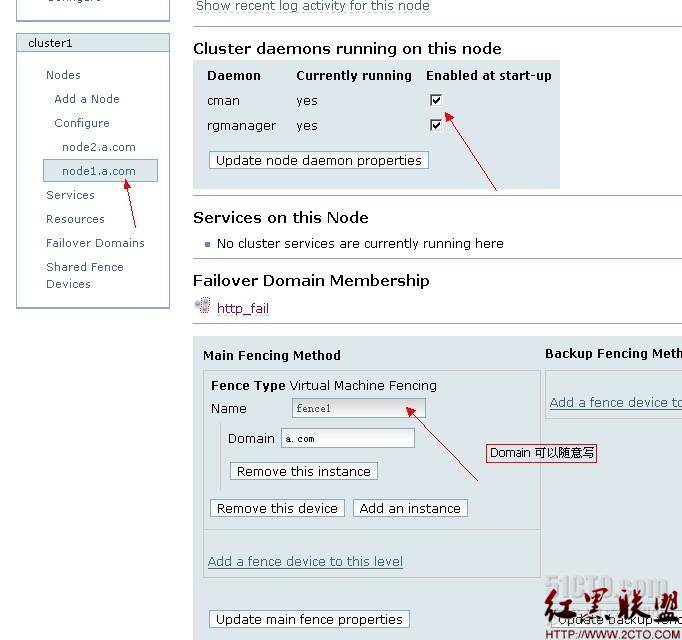
结点添加fence
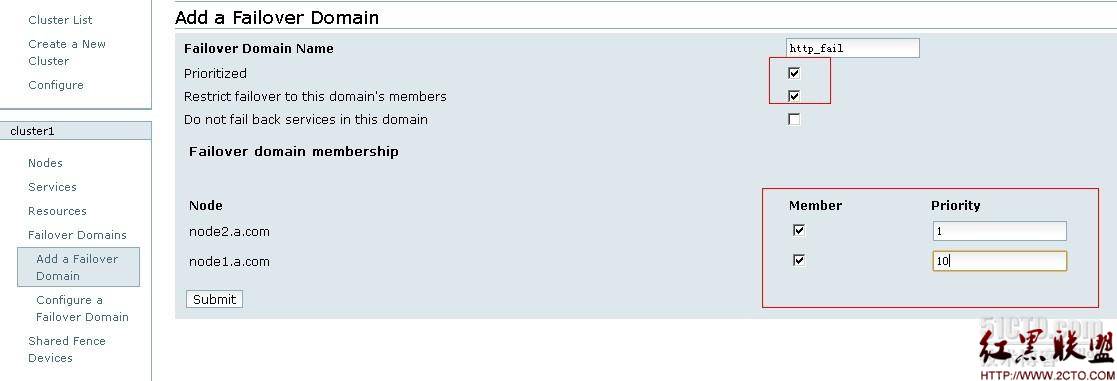
创建失效域
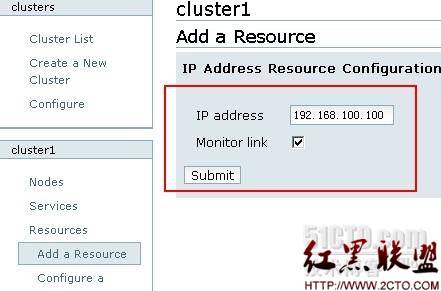
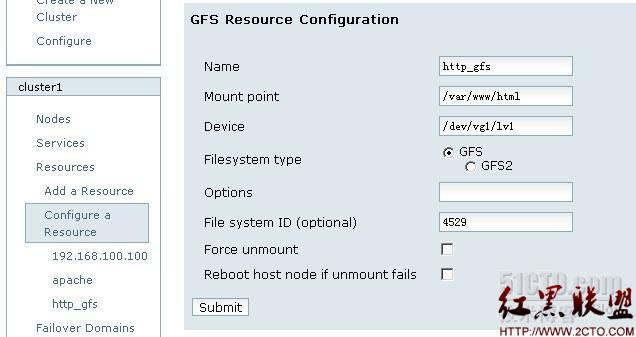
添加资源
IP
文件
服务
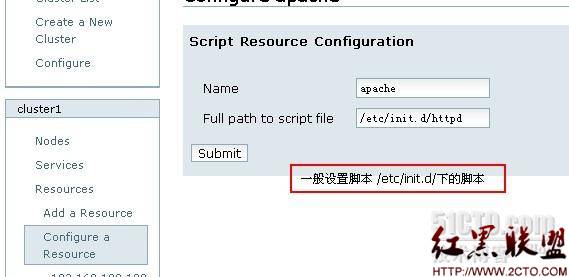
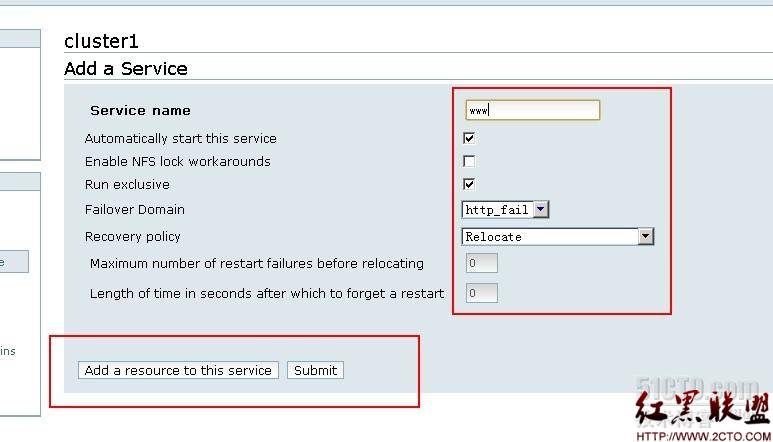
添加服务

本文出自 “紫衣封侯” 博客
(免责声明:文章内容如涉及作品内容、版权和其它问题,请及时与我们联系,我们将在第一时间删除内容,文章内容仅供参考)
相关知识
-
linux一键安装web环境全攻略 在linux系统中怎么一键安装web环境方法
-
Linux网络基本网络配置方法介绍 如何配置Linux系统的网络方法
-
Linux下DNS服务器搭建详解 Linux下搭建DNS服务器和配置文件
-
对Linux进行详细的性能监控的方法 Linux 系统性能监控命令详解
-
linux系统root密码忘了怎么办 linux忘记root密码后找回密码的方法
-
Linux基本命令有哪些 Linux系统常用操作命令有哪些
-
Linux必学的网络操作命令 linux网络操作相关命令汇总
-
linux系统从入侵到提权的详细过程 linux入侵提权服务器方法技巧
-

linux系统怎么用命令切换用户登录 Linux切换用户的命令是什么
-
在linux中添加普通新用户登录 如何在Linux中添加一个新的用户
软件推荐
更多 >


-
1
 专为国人订制!Linux Deepin新版发布
2012-07-10
-
2
CentOS 6.3安装(详细图解教程)
-
3
Linux怎么查看网卡驱动?Linux下查看网卡的驱动程序
-
4
centos修改主机名命令
-
5
Ubuntu或UbuntuKyKin14.04Unity桌面风格与Gnome桌面风格的切换
-
6
FEDORA 17中设置TIGERVNC远程访问
-
7
StartOS 5.0相关介绍,新型的Linux系统!
-
8
解决vSphere Client登录linux版vCenter失败
-
9
LINUX最新提权 Exploits Linux Kernel <= 2.6.37
-
10
nginx在网站中的7层转发功能