Linux实战工程师系列- Linux集群心跳检测HeartBeat实战
发布时间:2014-09-05 16:51:39作者:知识屋
Heartbeat简介
Heartbeat心跳实战试验
http://hi.baidu.com/%BB%C6%D0%C4%B2%A8/blog/item/d120a74da0e7fd38afc3ab09.html
Heartbeat原理
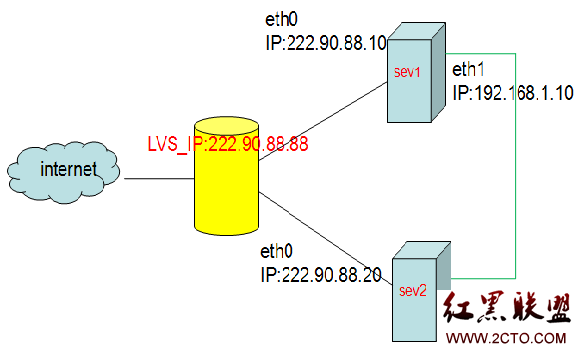
集群系统主要分为高可用性(High Availability)集群,简称HA集群。常见就是2个节点做出的HA集群,有很多通俗不科学的名称,比如“双机热备”,“双机互备”,“双机”。这样做的好处是当服务启动的时候,两台服务器一个作主(ser1),另外一个作从(ser2)。测试机每几秒会ping主机,当发现主机没有回应,就证明主机拓机了,那么从机马上会启动相应的服务,继续进行服务。这样就可保证服务部间断。

如上图sev1有两块真实的网卡eth0和eth1,ser2也有两块真实的网卡eth0和eth1,LVS_IP:222.90.88.88是两个真实的LVS(ser1和ser2)虚拟出来的。
操作:
两台有两张网卡(都是用桥接)的虚拟机ser1和ser2
在sev1安装ipvsadm,和heartbeat
heartbeat安装:
支持包:heartbeat-pils-2.1.3-3.el5.centos.i386.rpm
heartbeat-stonith-2.1.3-3.el5.centos.i386.rpm
安装包:heartbeat-2.1.3-3.el5.centos.i386.rpm(第一次装可能有问题)
#rpm -ivh heartbeat-pils-2.1.3-3.el5.centos.i386.rpm
#rpm -ivh heartbeat-stonith-2.1.3-3.el5.centos.i386.rpm
#rpm -ivh heartbeat-2.1.3-3.el5.centos.i386.rpm
#rpm -q heartbeat -d (解压出一系列配置文件)
#cd /etc/ha.d/(主要配置文件位置)
#cp /usr/share/doc/heartbeat-2.1.3/ha.cf /etc/ha.d
#cp /usr/share/doc/heartbeat-2.1.3/authkeys /etc/ha.d
#cp /usr/share/doc/heartbeat-2.1.3/haresources /etc/ha.d
#uname -n
sev1.example.com
#vim ha.cf
logfile /var/log/ha-log (打开日志文件)
logfacility local0
keepalive 2 (每2秒测试机发送一个广播)
deadtime 30 (30s没反应,立即切换服务。)
warntime 10
initdead 120
udpport 694 (udp是用端口)
bcast eth1 #Linux (指明心跳连接的接口号)
ucast eth1 192.168.1.20 (心跳连接的PC的IP)
node sev1.example.com (两个主机名【最好用uname -n查看】)
node sev2.example.com
ping 222.90.88.1 测试机的IP(要写外部的测试IP)
#vim /etc/ha.d/authkeys (开启验证模式,这是安全方面的配置里面有三种认证方式:crc md5 sha1)
auth 1
1 crc
#chmod 600 authkeys(不做此步,则heartbeat服务无法启动)
#vim /etc/ha.d/haresources(这个主要指明资源的来源,是远端挂载)
在
下增加一条
sev1.example.com 222.90.88.88 httpd (主节点的名称,虚拟出IP,启动httpd服务)
#vim /etc/hosts

#service heartbeat start
#vim /var/www/html/index.html
This is 1~~~
在sev2安装ipvsadm,和heartbeat
heartbeat安装:
支持包:heartbeat-pils-2.1.3-3.el5.centos.i386.rpm
heartbeat-stonith-2.1.3-3.el5.centos.i386.rpm
安装包:heartbeat-2.1.3-3.el5.centos.i386.rpm(第一次装可能有问题)
#rpm -ivh heartbeat-pils-2.1.3-3.el5.centos.i386.rpm
#rpm -ivh heartbeat-stonith-2.1.3-3.el5.centos.i386.rpm
#rpm -ivh heartbeat-2.1.3-3.el5.centos.i386.rpm
#rpm -q heartbeat -d (解压出一系列配置文件)
#cd /etc/ha.d/(主要配置文件位置)
#cp /usr/share/doc/heartbeat-2.1.3/ha.cf /etc/ha.d
#cp /usr/share/doc/heartbeat-2.1.3/authkeys /etc/ha.d
#cp /usr/share/doc/heartbeat-2.1.3/haresources /etc/ha.d
#uname -n
sev2.example.com
#vim ha.cf
logfile /var/log/ha-log (打开日志文件)
logfacility local0
keepalive 2 (每2秒测试机发送一个广播)
deadtime 30 (30s没反应,立即切换服务。)
warntime 10
initdead 120
udpport 694 (udp是用端口)
bcast eth1 #Linux (指明心跳连接的接口号)
ucast eth1 192.168.1.10 (心跳连接的PC的IP)
node sev1.example.com (两个主机名【最好用uname -n查看】)
node sev2.example.com
ping 222.90.88.1 测试机的IP(要写外部的测试IP)
#vim /etc/ha.d/authkeys (开启验证模式,这是安全方面的配置里面有三种认证方式:crc md5 sha1)
auth 1
1 crc
#chmod 600 authkeys(不做此步,则heartbeat服务无法启动)
#vim /etc/ha.d/haresources(这个主要指明资源的来源,是远端挂载)
在
下增加一条
sev1.example.com 222.90.88.88 httpd (主节点的名称,虚拟出IP,启动httpd服务)
#vim /etc/hosts

#service heartbeat start
#vim /var/www/html/index.html
This is 2~~~
测试:
当sev1(主节点),停掉heartbeat,则sev2(从节点)立即虚拟出一个IP:222.90.88.88
访问http://222.90.88.88会产生不间断的服务(页面为This is 2~~~)
当sev1正常后,会再次接管所有服务,重新虚拟出IP:222.90.88.88
作者“爱你linux”
相关知识
-

linux一键安装web环境全攻略 在linux系统中怎么一键安装web环境方法
-

Linux网络基本网络配置方法介绍 如何配置Linux系统的网络方法
-
Linux下DNS服务器搭建详解 Linux下搭建DNS服务器和配置文件
-
对Linux进行详细的性能监控的方法 Linux 系统性能监控命令详解
-
linux系统root密码忘了怎么办 linux忘记root密码后找回密码的方法
-
Linux基本命令有哪些 Linux系统常用操作命令有哪些
-
Linux必学的网络操作命令 linux网络操作相关命令汇总
-

linux系统从入侵到提权的详细过程 linux入侵提权服务器方法技巧
-

linux系统怎么用命令切换用户登录 Linux切换用户的命令是什么
-
在linux中添加普通新用户登录 如何在Linux中添加一个新的用户
软件推荐
更多 >-
1
 专为国人订制!Linux Deepin新版发布
2012-07-10
-
2
CentOS 6.3安装(详细图解教程)
-
3
Linux怎么查看网卡驱动?Linux下查看网卡的驱动程序
-
4
centos修改主机名命令
-
5
Ubuntu或UbuntuKyKin14.04Unity桌面风格与Gnome桌面风格的切换
-
6
FEDORA 17中设置TIGERVNC远程访问
-
7
StartOS 5.0相关介绍,新型的Linux系统!
-
8
解决vSphere Client登录linux版vCenter失败
-
9
LINUX最新提权 Exploits Linux Kernel <= 2.6.37
-
10
nginx在网站中的7层转发功能


