Nagios监控软件安装
发布时间:2014-09-05 16:51:47作者:知识屋
一,软件安装
ll
-rwxrwxr-x 1 root root 9097591 2009-12-31 nagios-20091231.tar.bz2
1.解压软件包
tar jxvf nagios-20091231.tar.bz2
2.安装
/soft/monitoring/nagios/nagios/bin/
./install.sh
3.
检查配置文件
rpm -ql nagios
/etc/httpd/conf.d/nagios.conf
/etc/logrotate.d/nagios
/etc/nagios
/etc/nagios/cgi.cfg
/etc/nagios/commands.cfg
/etc/nagios/localhost.cfg
/etc/nagios/nagios.cfg
/etc/nagios/private
/etc/nagios/private/resource.cfg
/etc/rc.d/init.d/nagios
/usr/bin/nagiostats
4.添加启动项
chkconfig --add nagios
chkconfig nagios on
5.检查配置文件是否正确
root@monitor nagios]# nagios -v nagios.cfg
6启动服务
/etc/init.d/nagios start
7.查看服务进程
ps axw | grep nagios
24782 ? Ssl 0:00 /usr/sbin/nagios -d /etc/nagios/nagios.cfg
24800 pts/1 R+ 0:00 grep nagios
8. 配置访问控制
[root@monitor nagios]# cd /etc/httpd/conf.d/
[root@monitor conf.d]# ls
cacti.conf nagios.conf php.conf python.conf squid.conf webalizer.conf
manual.conf perl.conf proxy_ajp.conf README ssl.conf welcome.conf
vi nagios.conf
1 ScriptAlias /nagios/cgi-bin/ /usr/lib/nagios/cgi-bin/
2 <Directory /usr/lib/nagios/cgi-bin/>
3 Options ExecCGI
4 order deny,allow
5 deny from all
6 allow from 127.0.0.1
7 allow from 10.24.29.0 #设置允许其它网段访问
8 AuthType Basic
9 AuthUserFile /etc/nagios/passwd
10 AuthName "nagios"
11 require valid-user
12 </Directory>
13
14 Alias /nagios/ /usr/share/nagios/html/
15 <Directory /usr/share/nagios/html/>
16 Options None
17 order deny,allow
18 deny from all
19 allow from 127.0.0.1
20 allow from 10.24.29.0 #设置允许其它网段访问
21 AuthType Basic
22 AuthType Basic
23 AuthUserFile /etc/nagios/passwd #访问密码存放位置
9.建立nagios 访问登陆用户密码
[root@monitor conf.d]# cd /etc/nagios/
[root@monitor nagios]# ls
cgi.cfg commands.cfg localhost.cfg nagios.cfg private
10. 添加登陆用户密码
[root@monitor nagios]# htpasswd -bmc passwd michael michael
Adding password for user Michael
11.验证用户和密码生成
[root@monitor nagios]# ls
cgi.cfg commands.cfg localhost.cfg nagios.cfg passwd private
[ root@monitor nagios]# pwd
/etc/nagios
root@monitor nagios]# cat passwd
michael:$apr1$NOb5F...$/Hlz07.veQcIM/ucJdkX50
12.重启WEB 服务
root@monitor nagios]# /etc/init.d/httpd restart
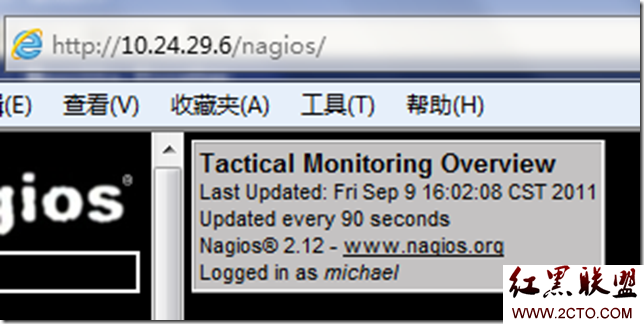
13.页面访问测试
14.修改WEB访问管理权限

[root@monitor nagios]# pwd
/etc/nagios
[root@monitor nagios]# ls
cgi.cfg commands.cfg localhost.cfg nagios.cfg passwd private
[root@monitor nagios]# sed -i 's/^#/(authorized_for.*/)=.*$//1=michael/g' cgi.cfg #脚本修改排至文件
授权Michel 登陆管理
[root@monitor nagios]# grep authorized cgi.cfg
验证
authorized_for_system_information=michael
authorized_for_configuration_information=michael
authorized_for_system_commands=michael
authorized_for_all_services=michael
authorized_for_all_hosts=michael
authorized_for_all_service_commands=michael
authorized_for_all_host_commands=Michael
15.登陆验证

登录成功! 监控设备添加和配置文件修改待续。。。。。。。。。。。。。。。
作者“康建华”
相关知识
-

linux一键安装web环境全攻略 在linux系统中怎么一键安装web环境方法
-
Linux网络基本网络配置方法介绍 如何配置Linux系统的网络方法
-
Linux下DNS服务器搭建详解 Linux下搭建DNS服务器和配置文件
-
对Linux进行详细的性能监控的方法 Linux 系统性能监控命令详解
-
linux系统root密码忘了怎么办 linux忘记root密码后找回密码的方法
-
Linux基本命令有哪些 Linux系统常用操作命令有哪些
-
Linux必学的网络操作命令 linux网络操作相关命令汇总
-

linux系统从入侵到提权的详细过程 linux入侵提权服务器方法技巧
-

linux系统怎么用命令切换用户登录 Linux切换用户的命令是什么
-
在linux中添加普通新用户登录 如何在Linux中添加一个新的用户
软件推荐
更多 >-
1
 专为国人订制!Linux Deepin新版发布
2012-07-10
-
2
CentOS 6.3安装(详细图解教程)
-
3
Linux怎么查看网卡驱动?Linux下查看网卡的驱动程序
-
4
centos修改主机名命令
-
5
Ubuntu或UbuntuKyKin14.04Unity桌面风格与Gnome桌面风格的切换
-
6
FEDORA 17中设置TIGERVNC远程访问
-
7
StartOS 5.0相关介绍,新型的Linux系统!
-
8
解决vSphere Client登录linux版vCenter失败
-
9
LINUX最新提权 Exploits Linux Kernel <= 2.6.37
-
10
nginx在网站中的7层转发功能


