现在我打算用两篇教学文章来教教大家用 HTML5, CSS3 以及 WinJS(就是微软为开发者提供用来创建 Windows 8 Metro 风格的JavaScript框架) 来创建一个简单的RSS阅读器。当然这次的开发工具将采用 Expression Blend 5。如果一切进展顺利,你大概只需要30分钟就能完成这两篇文章的所有教程。
第一篇文章将告诉你如何使用 WinJS ListView 控件来创建启动屏界面。此控件将显示近期所有的博客列表(当然它们都配有一个不错的缩微图)。第二篇将展示当某个博客被点击后视图显示的细节。
- H/ _) Q" l9 Y/ L8 G" o3 E. }
在开始我们的教程前,你必须先:
6 g, G9 J+ w2 T& n3 j( c- A
1,下载并安装 Windows 8 Release Preview http://preview.windows.com
" P. R6 c5 E6 i$ m. l3 j/ R
2,下载并安装 Visual Studio 2012 RC Express http://msdn.microsoft.com/en-us/windows/apps/br229516
以下就是整个教程的大纲
- Step 1: 创建一个空应用
, A# g q- p/ f- i) M" [
- Step 2: 使用HTML & CSS创建首页
/ `2 K4 N8 {, t- t+ P( I
- Step 3: 与Blend交互
0 d, y, S* m# Z
- Step 4: 使用XHR加载数据然后绑定到ListView控件
- Step 5: 使用Blend的模板来修改外观设计
" g0 d; }5 d5 H' U
- Step 6: 用视频展示所有的步骤以及提供源码下载
3 |- o0 K: v$ S* d+ v0 R
4 ], i. ^- K( {! N
Step 1: 创建一个空应用
启动 Visual Studio 11 然后新创建一个 JavaScript Windows Metro Style的项目。
( h3 E/ R! A9 o i3 A& ?/ r
选择"File -> New Project":
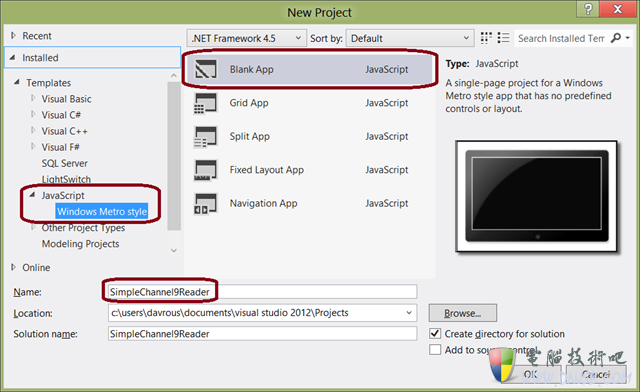
这里命名为"SimpleChannel9Reader",因为是打算将从Coding4Fun的Channel9频道去下载RSS流。http://channel9.msdn.com/coding4fun/articles/RSS
Step 2: 使用HTML & CSS创建首页
打开 "default.html" 文件,该文件就是应用的启动首页。然后将以下代码:
[backcolor=rgb(255, 255, 255) !important]
|
1
|
Content goes here y# {) A$ w7 ^/ b4 g# R
|
. l' b/ @% j* S
9 n; K7 G8 W- a7 ?# x- T
改成
[backcolor=rgb(255, 255, 255) !important]
2 r t' g2 R5 F9 o9 K1 d
[backcolor=rgb(248, 248, 248) !important]
|
2
|
8 h% P# Z- u1 p. {- Z, y$ | |
[backcolor=rgb(248, 248, 248) !important]
! p$ m6 Y. w/ ]2 R9 E& T
' {% v5 ~: N8 P* ^. U' W3 O
[backcolor=rgb(248, 248, 248) !important]
6 x& h! o: C9 T% ^" R
6 B: y o! t4 D/ w* f `1 x
[backcolor=rgb(248, 248, 248) !important]
|
8
|
# L; U# G) X# B$ ]' a: y |
* z$ j, N: U2 ?6 Y
, ^, a+ X! A% h2 P$ a
现在就有了一个 id 为"main"的全局div,然后里面嵌入两个容器分别命名为"banner"与"content"。很明 显header将显示在页面的顶部,content区域将显示在header区域的下面。
OK,现在该添加一些css。打开css目录下的"default.css"文件。你将会看见这里已经有了一些预定义的 css,这些都归功于 Media Queries.
7 r) m* ^' c! r
, |! p; O, b! Q% K
提一下,在此系列的两篇文章中,我们将集中精力在"fullscreen-landscape"状态。所以先添加如下CSS:
. t: d, L3 b$ c! s, R/ ~1 B. K2 J$ r
[backcolor=rgb(255, 255, 255) !important]
* q+ c1 t' D2 {
[backcolor=rgb(248, 248, 248) !important]
[backcolor=rgb(248, 248, 248) !important]
" N% X3 y9 Y7 X, X- Y/ l
[backcolor=rgb(248, 248, 248) !important]
/ c0 X: m" {( o; Y9 _/ c2 E- H/ s
[backcolor=rgb(248, 248, 248) !important]
[backcolor=rgb(248, 248, 248) !important]
( r# T' e; e6 Y( H; s9 L7 C+ H1 ~
[backcolor=rgb(248, 248, 248) !important]
9 Z: m/ l" D1 V# v) e. V
[backcolor=rgb(248, 248, 248) !important]
[backcolor=rgb(248, 248, 248) !important]
' ^0 `" p5 n2 S4 o* }& h5 q* `
[backcolor=rgb(248, 248, 248) !important]
. i8 T+ U( ?" ^- ?6 B: B, z) P
[backcolor=rgb(248, 248, 248) !important]
& z$ T# V- a ^) b
9 i# S) ]4 Y/ w' h; i; d
1 R) B' b e# N# x& }- I6 M
% r! T- j7 X" ~" N- o. f
以上代码表示我们将使用这三个容器的全部空间。
4 r* J/ E, M- l0 R$ i; {
现在可以直接按F5或者点击下图这个按钮来启动应用。

运行起来你将能看到下图这个样子。
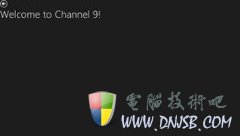
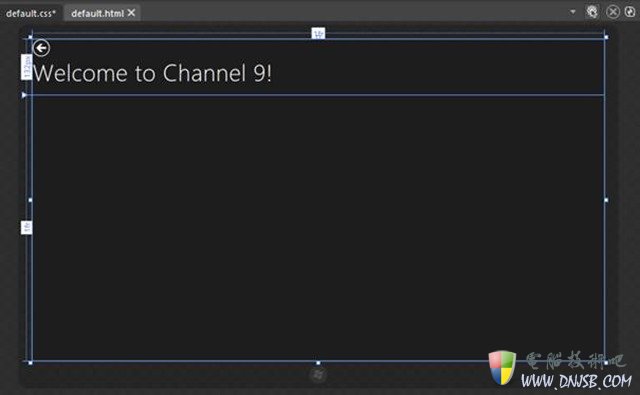
你应该看到这里有个设计缺陷:后退按钮以及标题显示都不很搭调,所以来让Blend 5去解决吧!
W% U' `' U6 k' ?, L; T6 R
Step 3: 第一次使用 Blend
3 O, k' f' A9 j. A% O' f
启动Blend然后导航到 SimpleChannel9Reader 项目文件夹。如下图:
6 I! H B% Z& m' B
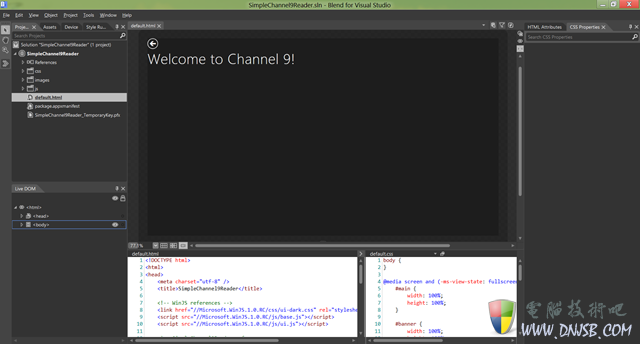
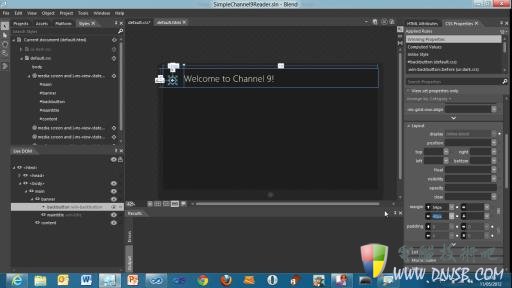
这里是为了创建两个网格。第一个将表示 main container. 将占据一列两行。而第二个网格将占据一行两 列来放置后退按钮以及标题。 先使用"Live DOM"窗口选择"main"元素
7 K# v. L" j! q8 I
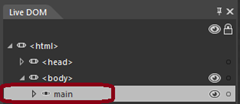 # }$ k$ F" I r' e, d
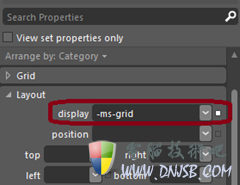
然后到"CSS Properties"区域,在"Layout"窗口下选择 #main 规则,然后将显示设置为"-ms-grid":
2 N% D4 J1 _/ r7 Q l. x: ]6 {3 x
 . h; v% I3 n* W3 A/ h" a
I2 j* u1 [8 J1 B4 P
& x/ _( k4 J' p, P' a6 n& [1
刚才使用的 CSS Grid Layout 的这些特性暂时还仅仅就IE10支持,但是以后越来越多浏览器将都支持的, 如果你希望知道更多Metro风格的布局知识,你可以参考这篇文章:Choosing a CSS3 layout for your
) J! S0 O8 [4 K1 y/ E* ^
如果你希望只是CSS3 的网格布局,你可以尽管测试这个IE Test Drive Demo:Hands On: CSS3 Grid
3 d5 X4 [ ?8 g
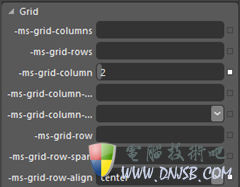
OK,现在显示在Gird上已经比较正常,现在跳转到"Grid"部分来定义以下属性:
) ~) C# S6 F* a2 R% H
( D( ~5 `- N; `, o& I* m
这种定义将让一列占据整个空间而不管应用的分辨率是多大以及两行,第一行是固定的132像素高度,然后 剩余的行将占据剩余的高度。如下图
/ `2 y1 a4 i1 x" i" h' S( Y
现在再到第二行的"content"元素。选择"Live DOM",选择#content规则接着然后移动到"Grid"属性。修改 "-ms-grid-row"的值为2。你也可以移动"banner"元素到第二行,否则banner将自动放在第一行。
! i" M7 P/ Q0 w5 d
接着我们将第一行分割为两列,是为了让各个元素放置到正确的位置。选择"banner"元素,然后设置它的 display属性为"-ms-grid"。
% g) ] h9 k9 N+ Y" i$ y
, y6 [. P/ y7 z4 r
移动"maintitle"元素到第二列然后设置"-ms-grid-row-align"属性为"center"
 ' E; |5 |# t- ~9 L$ [" V
0 U) [, m P% K+ Z+ D6 @
6 R; A8 g! L/ w2 W+ L
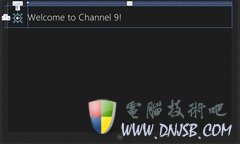
选取"backbutton"然后选择"Layout"部分,设置top margin属性为54px以及left margin属性为40px。如果 一切都按照指导来的话,你应该看到如下图这样。
- F- S3 F6 q( H3 ^
- e& H3 l0 L3 x/ S# }7 o
0 X/ S& r- w6 Z1 Q" @* M
点击"Save All"按钮然后退回到Visual Studio。打开"default.css",就能看到Blend生成的CSS:
1 p' * 9 a2 h8 B' V
[backcolor=rgb(255, 255, 255) !important]
|
01
|
@media screen and (-ms-view-state: fullscreen-landscape)
|
[backcolor=rgb(248, 248, 248) !important]
/ p: B( Q7 Y$ ^
[backcolor=rgb(248, 248, 248) !important]
7 B9 S6 x: * I' j4 D2 y9 N5 `
[backcolor=rgb(248, 248, 248) !important]
[!--empirenews.page--]分页标题[/!--empirenews.page--]
# G" [7 P$ w' H8 X4 s3 O
[backcolor=rgb(248, 248, 248) !important]
|
08
|
-ms-grid-columns: 1fr;
|
d6 U, U t& J0 C. S4 N& o
|
09
|
-ms-grid-rows: 132px 1fr;
|
[backcolor=rgb(248, 248, 248) !important]
* H! {. u; ~! H* O
[backcolor=rgb(248, 248, 248) !important]
" N' U" d6 ~+ u& {' k, h( V2 w$ U: C
[backcolor=rgb(248, 248, 248) !important]
[backcolor=rgb(248, 248, 248) !important]
|
16
|
-ms-grid-columns: 120px 1fr;
|
8 6 l4 F8 y$ H7 F3 A7 H6 U
o5 M9 X# R$ F g! B1 ~
[backcolor=rgb(248, 248, 248) !important]
: E c4 Y( ^. M$ X
[backcolor=rgb(248, 248, 248) !important]
k M! c; i. s7 N3 x
[backcolor=rgb(248, 248, 248) !important]
6 b5 y2 ?. `- u# k1 R4 M, q
[backcolor=rgb(248, 248, 248) !important]
7 q* q( Y. a v% s! Y0 E- P
[backcolor=rgb(248, 248, 248) !important]
|
27
|
-ms-grid-row-align: center;
|
4 � J8 K: i: y/ R- Z3 q/ i
[backcolor=rgb(248, 248, 248) !important]
- L' i5 T( k9 y* t) b+ c: K+ I
[backcolor=rgb(248, 248, 248) !important]
# z! k' N) a) W* g* M7 y
[backcolor=rgb(248, 248, 248) !important]
6 w: l' V: m. J6 ?" n: g+ S R' G
[backcolor=rgb(248, 248, 248) !important]
! K* e* _( l7 m, j: o
* b9 Q6 b& G" y5 s) _" h" p
: q) V" B8 N; M7 `- J* S5 q
9 F' v* O3 |% L- h7 a1 e! S+ S# B
最后点击F5去运行
9 {. C. d7 s$ o+ e
Step 4: 使用XHR加载数据然后绑定到ListView控件
: e$ g5 V# |3 b% n+ s4 {: v
好了,来看看后台代码
& B& B# h V U1 y
首先就是为启动屏的文章列表添加缩微图。这就需要使用WinJS来处理了。
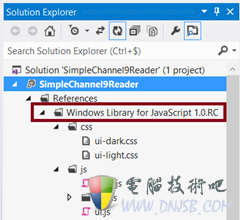
WinJS库或者"Microsoft Window Library for JavaScript SDK"就是为了让JavaScript开发人员来创建 Windows 8 Metro风格应用的。它提供了一系列Metro控件,模板引擎,异步处理方法以及辅助类等等。
例如,如果你想了解更多这个方面的话,你可以阅读这篇文章: Quickstart: adding WinJS controls and styles
4 `3 O" {' q( i$ s$ Z
在Windows 8 Metro应用中,你可以从"Solution Explorer"找到这个库的引用,如图。
J+ @" ~ c% R6 Q
 0 L/ h j/ U( ^9 o) o, i
8 |1 D3 B5 s( ^7 ~$ Y4 O
同时,这里面你也可以找到几个默认的CSS主题。
7 D- ` j" G+ o# W- f4 x
在我们的案例中,将使用ListView控件来创建显示博客列表的网格。
% W" ]$ M! e) u' {" W
打开"default.html",输入以下HTML:
5 b* ]" `. V/ ?: d' C
[backcolor=rgb(255, 255, 255) !important]
|
1
|
2 Q5 t @7 t( x [7 y, X0 S% ] |
# I( J) Z. b0 N V
0 [9 y: u5 b! p9 ]: ^
; + o7 I8 ^! n& x; F; M0 U+ |
6 b7 l3 Z. � C" _$ d
现在,这里只有一个简单的经典div。然而,它已经被标记了 data-win-control 属性,代表它使用的是 WinJS 库来将这个简单 div 转换成 JavaScript ListView 控件。
' V8 c0 m5 p9 L, m6 D5 C
有意思的是这个功能只需要一行代码:
- Y- : x- I w# w) F' n
[backcolor=rgb(255, 255, 255) !important]
, @6 ]5 W' C+ N r
* j6 C* w6 Y' E
) H) F$ Q2 q8 M: f. p
这个异步操作将会把所有标记了"data-win-control"标记的元素转换为 WinJS控件。所以没有没有这个标签的话,那它就是一个简单div。 现在终于到了从RSS获取信息填充到ListView的时候。在"onactivated"事件中,在 processAll( );上添加如下代码:
; t& ` K3 }. v6 x
[backcolor=rgb(255, 255, 255) !important]
|
1
|
articlesList = new WinJS.Binding.List();
|
[backcolor=rgb(248, 248, 248) !important]
|
2
|
var publicMembers = { ItemList: articlesList };
|
|
3
|
WinJS.Namespace.define("C9Data", publicMembers);
|
2 ]* N$ J# C# |; r
! ]2 a/ l# M9 U, E3 M; E ?4 ]9 Y# J
. t* D" b0 b0 M2 M: c5 r0 n
你需要在方法中声明一个"articlesList"的变量。
Binding.List( ) 类型被用来绑定数据到WinJS控件,它包含了一些方法将帮助你在后台添加数据。而且由于它内部良好的绑定机制,当数据改变时,视图会自动变化。
; {. M: N. p" }: |: _; F( x [
还没完,你也许会注意到这里使用了简洁的JavaScript代码配合"module pattern"模式。这里使用了自动执行的匿名JS方法到"default.js"中。接下来需要找到输出数据的方法。这就是为什么需要实现Namespace的原因。这个案例中需要输出一种类型为"C9Data"的对象。而且这些对象也具有用来显示的"ItemList"属性。
& R8 W4 R9 ]8 q4 j2 a; a
& c1 B; H8 f' @; r- L; c
现在来写一个方法从RSS那边获取数据。然后转译成JS对象:
[backcolor=rgb(255, 255, 255) !important]
|
1
|
function downloadC9BlogFeed() {
|
6 n7 [+ x: x; o- m
[backcolor=rgb(248, 248, 248) !important]
|
2
|
WinJS.xhr({ url: "http://channel9.msdn.com/coding4fun/articles/RSS"}).then(function (rss) {
|
|
3
|
% w% G: q' X5 E# h6 }2 u! ^7 C; I& ` |
[backcolor=rgb(248, 248, 248) !important]
2 {( j0 B2 X: n5 [
8 V# P, ~7 m5 `+ k9 7 B
- A+ W+ x9 j$ b/ E2 q" z
[backcolor=rgb(255, 255, 255) !important]
|
01
|
var items = rss.responseXML.querySelectorAll("item");
|
[backcolor=rgb(248, 248, 248) !important]
; j1 U, - o* q" s* r: Y8 T
|
03 |
for (var n = 0; n < items.length; n++) {
|
[backcolor=rgb(248, 248, 248) !important]
) `/ Q+ ^& ?, A5 @2 {7 W: v
|
05
|
article.title = items[n].querySelector("title").textContent;
|
" f$ W5 Z4 K: V7 S
[backcolor=rgb(248, 248, 248) !important]
|
06
|
var thumbs = items[n].querySelectorAll("thumbnail");
|
* o$ v3 u2 M/ A' z+ Y; y
|
07
|
if (thumbs.length > 1) {
|
[backcolor=rgb(248, 248, 248) !important]
|
08
|
article.thumbnail = thumbs[1].attributes.getNamedItem("url").textContent;
|
$ C9 W5 e7 L1 ?+ U
|
09
|
article.content = items[n].textContent;
|
. |% `% S- ]4 r& ?! E* D
[backcolor=rgb(248, 248, 248) !important]
|
10
|
articlesList.push(article);
|
[backcolor=rgb(248, 248, 248) !important]
我希望这些代码应该能表达清楚意思。它通过"item"节点获取到它的任何属性(title,thumbs以及content属性)。当然这里要记住这些属性的名称;等会就要用上的,最后的代码就是为集合中添加数据。
) L! q8 U! }. C. F. D6 z
那么现在使用这行代码后再启动应用:
[backcolor=rgb(255, 255, 255) !important]
|
1
|
WinJS.UI.processAll().then(downloadC9BlogFeed);
|
9 p+ k" B) g! r- C7 C
( Q4 [" n, M7 2 k$ F5 s
; o1 p8 @: K% n9 h: B, I- z) Y2 `
# P' ?! |+ g) w, ^) w# S" E
接下来指定这个控件的数据源。
[backcolor=rgb(255, 255, 255) !important]
|
1
|
<div id="articlelist" data-win-control="WinJS.UI.ListView" [="" align][="" td][="" tr]
|
0 ?& k2 V" f: p+ Z5 t* K5 S% `
[backcolor=rgb(248, 248, 248) !important]
|
2
|
data-win-options="{ itemDataSource: C9Data.ItemList.dataSource }">
|
[!--empirenews.page--]分页标题[/!--empirenews.page--]" G! ?' n- f7 U+ ~2 ^" p; w1 t
v W' _# U0 W, d
0 I1 v, _- q% f* }
0 [3 t% }& U1 |- m3 Y
/ ]# v1 S& O6 C# {8 z
! ?7 Z+ ?* f6 m5 H: g$ b, |) [7 @7 u
最后,我们需要一些基本的CSS来展示这些东西,在"default.css"中添加以下代码:
# @& M( G; n* E+ L& [( t5 d
[backcolor=rgb(255, 255, 255) !important]
- b+ u9 l& t$ D$ o) j5 }
[backcolor=rgb(248, 248, 248) !important]
! @: Y8 j: M- T
[backcolor=rgb(248, 248, 248) !important]
7 M$ N& f4 x8 T k% U7 g
|
5
|
+ G6 Y9 z5 H' d, K* v) w+ L |
. z" _/ M, |8 G7 c/ u
[backcolor=rgb(248, 248, 248) !important]
|
6 |
#articlelist .win-item {
|
2 X& P" L2 U" v% ?& c
[backcolor=rgb(248, 248, 248) !important]
: ]% x8 o3 P' O/ ~ `+ J
5 l5 F1 F5 }2 j/ u
0 p& z ^: G2 e* o% O t
5 r& c, |5 E9 e( [% R6 M
" h( D- ?8 i6 J) w! Q
这个CSS表示ListView控件将占据所有的容器控件,而且每一个单个项目将占据150x150像素大小。7 G p/ m& B J1 o' @" s$ J% N+ }
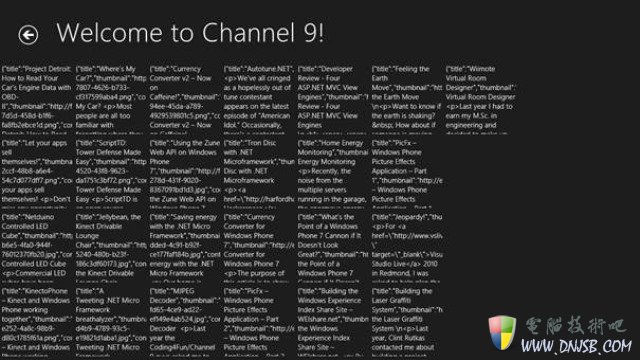
好了,再按F5,你将能看到下图这样。
/ |3 ^3 C' s6 p9 U# S
8 P y- n: n2 O' s# T0 |
先别急,这样丑陋的外观完全就是预期的!我们还需要完成一部分设计工作。
( w# {! |. v5 c' u
! J" Y- ]+ C6 R* D- i* t' V
Step 5: 使用Blend的模板来修改外观设计
到了该修改外观的时候了,这里比较简单,只需要修改一段简单的HTML模板就行,可以看出里面填充了不少WinJS标签。
0 P% [, D, ?9 u$ o9 J. t' x
回到"default.html"页,然后在"main"区域的上面添加如下HTML代码:
6 M5 [- x f9 y* f8 e! c
[backcolor=rgb(255, 255, 255) !important]
[backcolor=rgb(248, 248, 248) !important]
|
2
|
/ i- 6 W* f, y5 _# y# 7 K/ a7 V |
|
3
|
8 _9 ^; n e l+ A2 R$ Q) q& g g |
! T j7 H( I; e! O( a: _6 u
[backcolor=rgb(248, 248, 248) !important]
+ ^: k* q& ?# }9 G
[backcolor=rgb(248, 248, 248) !important]
1 j J! r: Y0 A/ T
|
7
|
6 g* M0 Z* Z( q3 g2 ; S+ e |
[backcolor=rgb(248, 248, 248) !important]
! g2 ! a/ `! _6 d$ j
: 3 l g2 w7 ~) a( f. C! X
2 O' e9 T- Y0 Z" O. J4 f
% Q; Y$ l$ G9 {3 c9 I
* Q- R3 z {7 z' c6 ^0 x
这就是一个标记了“WinJS.Binding.Template”的HTML模板。也展示了"data-win-bind"定义的表达式的用法。
最后我们需要定义WinJS控件不要去使用默认的模板而是使用刚才我们创建的模板。
[backcolor=rgb(255, 255, 255) !important]
|
1
|
<div id="articlelist" data-win-control="WinJS.UI.ListView" [="" align][="" td][="" tr]
|
[backcolor=rgb(248, 248, 248) !important]
|
2
|
data-win-options="{ itemDataSource: C9Data.ItemList.dataSource, itemTemplate: C9ItemTemplate }">
|
& D7 G( r8 X$ ~" V2 b' s; i
+ B7 r; C* b" V6 ?( i) X2 h
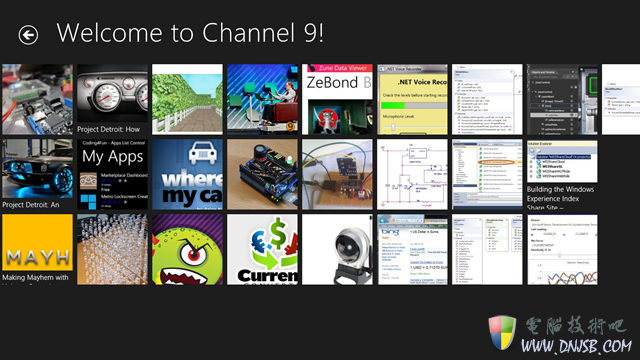
如果你再运行程序的话,你将看到下图这样:
( }$ |. M9 t% |- a
 ! E x8 G0 x$ ?" I
( L5 O; k$ [* W7 Q: {
) v# @8 E4 s/ ?6 v/ g- A% F
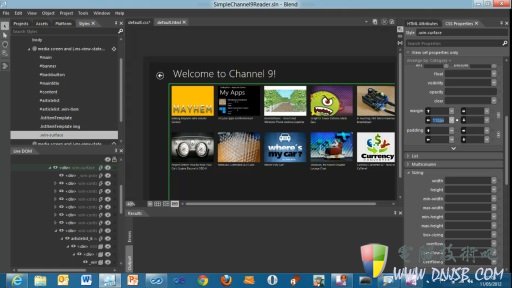
顺便提一下,如上图所示,Blend 5是所见即所得的设计界面,这实在太爽了。
Step 6: 用视频展示所有的步骤以及提供源码下载
下面就是两个 HTML5 教学视频,涵盖了我这篇文章的所有细节。
注意:这些视频还只是Consumer Preview版的,我等会更新到Release Preview版。
2 r3 ]1 a6 1 |, b2 e: H
第一个视频演示了步骤 1,2,3.
% o2 f) B' F9 u# [1 Q9 D+ ]; _3 H P( O
第二个视频演示了步骤 4,5
好了,说了这么多,这里放上文章案例的源码.
本文来自;开源中国社区(免责声明:文章内容如涉及作品内容、版权和其它问题,请及时与我们联系,我们将在第一时间删除内容,文章内容仅供参考)


